[Abstract] In order to obtain high-quality TV pictures, correct exposure is essential. When shooting some high-contrast scenes, it is necessary to fully record the details of the highlights and shadows. It is essential to understand the relationship between latitude and light.
[Keywords] camera digital camera latitude dynamic range exposure
Introduction
Whether in the studio or outdoors, we often encounter some high-contrast scenes when shooting. At this time, we may want the screen to record all the details, but the result is often to lose sight of each other, not to highlight the highlights and shadows. The details are completely recorded. Why is this? This is actually caused by insufficient camera tolerance. Tolerance is an important concept, understanding the relationship between latitude and light helps us get a more accurate exposure in the camera, resulting in a better picture. The imaging principle of modern cameras and digital cameras is the same. The difference lies in a dynamic picture and a static picture. Due to the flexibility of digital camera operation, this paper mainly introduces some problems between latitude and light through digital cameras. Of course, these problems The same is true for cameras.
First, the tolerance of the camera
The so-called tolerance, simply said, is the ability to record the lightest and darkest details and levels of the picture at the time of shooting. The tolerance is high, the brightest and the darkest light difference will be wider, and the details of the different brightness will be preserved intact; on the contrary, the tolerance is low, and the display of the light difference can only be limited to a small range. Inside, the details of the picture outside this range will not be well recorded.
First look at a real situation: we use a brand of SLR camera to shoot a person's face close-up, measured with the light meter after the face reduction of the exposure parameters is 1 / 250 seconds, f8, we keep f8 unchanged, respectively 1/4000, 1/2000, 1/1000, 1/500, 1/250, 1/125, 1/60, 1/30, 1/15, 1/8, 1/4, 1/2, 1 In seconds, we will get a series of photos from all black to all white. Many people think that this paragraph is just the tolerance of the SLR camera from just a little light to the whole white in the dark, but in fact this understanding is wrong. If we use 1/250 second to expose, we will get a perfect photo of the face, then what about the point around 1/250 second? This neighborhood refers to the two directions, that is, overexposed A little or less exposed. For example, it takes 1/125 seconds, is it perfect? ​​It's perfect, then it's another file, 1/60 second, is there no loss in details? Then it will go through a file until you find the point where you lose the details, in another In the underexposure direction, we also use the same method to find such a point. Tolerance refers to the range between such two points. In this example, assuming that the range is from 1/1000 to 1/30 second, we count it for a total of 5 files, then we call the SLR camera a latitude of 5 stops.
We have a lot of research on the theory of tolerance, but what does tolerance mean, and how we use latitude to get a better picture when shooting on the spot, we need to think seriously. Therefore, every time we take a recording, we need to seriously consider some of the problems that latitude may cause.
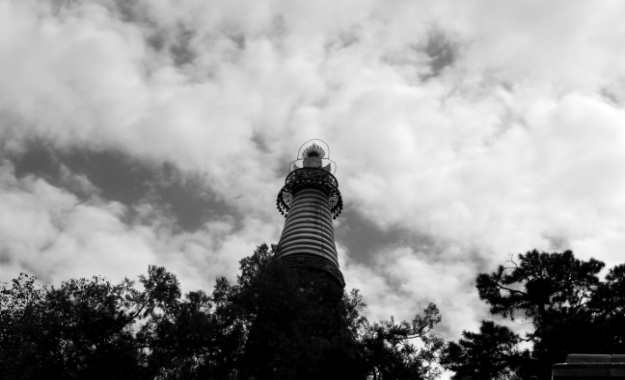
Figure 1 Scene with a wide brightness range
When measuring a scene, we usually use a light meter to measure the lowest brightness value and the highest brightness value in the picture. After the highest value and the lowest value are measured separately, compare the two. Now let's look at a scenario, as shown in Figure 1. In practice, there are many scenes, the sky is very bright, and the shadows of the towers and trees are very dark. This is a scene with a wide range of brightness, or a scene with a large contrast and high contrast. Now suppose that the scene brightness range has 11 apertures, but the camera latitude we use is only 7 apertures. So the question is, can we fully record the brightness values ​​in this scene? The answer is no, we can only Record a part.
As for which part of the brightness value to record, it depends on what kind of photo we want to get. It is hoped that the tower will have all the details. The cloud also has most of the details. The tree shadow can be black, or hope to highlight the blue sky and white clouds. Or the key part of the shaded tree of the performance tree. But in any case, we must sacrifice some details here, and this is the result of insufficient tolerance.

Figure 2 Scene with narrow brightness range
Let us assume another scenario, as shown in Figure 2. Now that we are measuring the light intensity in this scene, it is not difficult to find that the light distribution of the entire scene is very uniform. The roads and some of the items carried by the mountaineering enthusiasts are the highlights in this scene. The brightness range of the whole scene is very narrow. From the bright high-light area to the low-illumination area, the second-stop aperture is also available. If we use a camera with 7-stop aperture latitude, it is convenient to record the entire brightness range. This is like putting 20 peaches in a box that can hold 50 peaches. It's easy to do without any difficulty.
Second, latitude and dynamic range
When we talk about photographic equipment, we often hear the words "tolerance" and "dynamic range", and the frequency of occurrence is quite high. Many manufacturers pay great attention to these two concepts, and some manufacturers take "wide dynamic range" as their own advantage, and some manufacturers do particularly well to optimize the dynamic range, and there are related graphic settings in the camera, such as Nikon cameras. D-Lighting in the menu, Canon's "Highlight Tone Priority" is a dynamic range optimization function. Similarly, the relationship between latitude and dynamic range is also applicable to cameras.
"Range" is a relative quantity that is scalable and is a range between the highest and lowest values, which can be represented by a difference. Technically speaking, "dynamic range" is actually a range of objects we shot from the lowest brightness to the highest brightness. In the field of camera photography, we usually use the exposure level EV (Exposure Value) to indicate that each time an EV is increased or decreased, it means that the exposure is doubled or doubled. In this way, the dynamic range can be expressed by the difference between the highest brightness and the lowest brightness EV. Here, we use a few aperture values ​​to indicate the degree of latitude.
In the large dynamic range scene, the brightness and darkness are particularly large, the whole picture has high contrast and rich layers; in the small dynamic range scene, the brightness of the whole picture is similar, the contrast is low, and the level is slightly dull. The large dynamic range scene and the small dynamic range scene here are actually high contrast (large light ratio) and low contrast (small light ratio) scenes that we often say in our work. After analysis, we can easily find that the tolerance can also be said to be the maximum dynamic range of the scene that the machine can record during shooting. The greater the dynamic range that the camera can represent, the higher the tolerance and, conversely, the lower the tolerance.
Third, tolerance and screen exposure
Reasonable exposure is especially important for cameras. The reasonableness of exposure directly determines the quality of the picture. The concept of tolerance has been proposed very early, just to guide the exposure. In actual shooting, we must understand the truth: tolerance is not used after the film is taken, but as a theoretical decision-making basis for determining exposure before filming. The fundamental purpose is to maximize each specific exposure. The use of the machine's own tolerance, to maximize the recorded picture information, the most perfect. I understand that I still don't understand this. It is very important to understand the tolerance and the reasonable use of light in this situation.
The application of tolerance in exposure control is actually three situations. Let us introduce them one by one.
1. High contrast scenes larger than camera latitude
Now let's talk about a high contrast example, as shown in Figure 3. We use spot metering to measure the brightest part of the wave and the darkest part of the sky and the reef. There is a 7.5-stop aperture. The water surface is very bright and higher than the sky. It is a high-light ratio (high contrast). In this case, we I need to make a choice. What do I want to show in this photo? I want the sky to have all the details, the waves have most of the details, the reef can be black, so I meter the sky, here To use latitude. According to the sky point measurement value of 1 / 100 seconds, f8, minus 2 exposure, that is, according to 1 / 100 seconds, f16 to actually shoot, this is the use of tolerance. After reducing the aperture of the two gears, the details of the sky are almost not lost. Looking at the part of the wave, the 7-stop aperture starting from 1/100s, f8 includes:
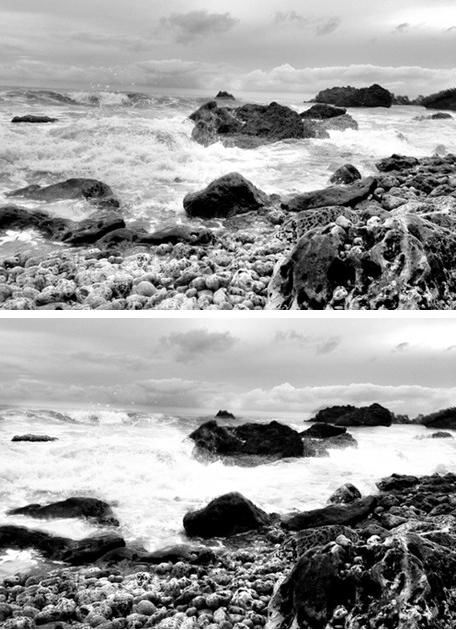
Figure 3 High contrast scene comparison chart
1/100 second, f8-------------------0 (sky metering value)
1/100 seconds, f11------------------1
1/100 seconds, f16------------------2 (real shot)
1/100 seconds, f22------------------3
1/200 seconds, f22------------------4
1/400 seconds, f22------------------5
1/800 seconds, f22------------------6
1/1600 seconds, f22-----------------7 (year-on-time metering value of the brightest part of the wave)
For the 1/1600 second of the wave, the actual measurement of f22, to 1/100 second, the real shot of f16 is just equivalent to the 5th aperture. According to the analysis of tolerance, the wave only loses a little detail, just the blackest part of the reef. It’s a bit darker, but it doesn’t have much impact on the whole.
This is the application of tolerance in guiding exposure. If we directly use the measured value of 1/100 second, f8 is exposed to the sky instead of minus 2 apertures, then it will cause the waves to overexpose 7 files, and the details of the waves will be lost. Most of them, that is to say, we only used 5 of the 7-speed latitude, and 2 of them were wasted. The lower half of Figure 3 was taken with actual measurements of the sky, and there is clearly a problem of high light spills and missing dark parts. Another similar example is when we shoot a portrait backlit, we need to use a reflector to fill the face. If you directly press the face, the sky is easy to expose. When we understand the use of tolerance, it will make us more calm and face the results we want in the face of high contrast scenes, but there will always be sacrifices at this time, bright and dark parts are impossible.
2. Low contrast scenes smaller than camera latitude
According to the definition of "Photography Teaching Materials of the New York Institute of Photography", the low contrast scene refers to the scene where the brightness range from the brightest glare area to the dark shadow area does not exceed the third aperture, and the high contrast scene is not less than 7 Aperture. Obviously, Figure 2 is a low contrast scene and Figure 3 is a high contrast scene.
Shooting in low-contrast scenes is very easy. At this time, an incident meter or gray meter can achieve ideal exposure. Basically, it does not require too much operation. Even if the exposure is a little biased, it does not matter much.
3. Contrast scene equal to camera tolerance
Here, in theory, we can record all the details of the highlights and the dark parts. If we think that the dark parts are more important, then we will not directly make any adjustments to expose the dark parts, but this will waste part of the tolerance of this digital camera. This leads to the loss of detail in the highlights, which in turn leads to the loss of details in the dark. Therefore, at this time, we can only expose according to the individual's focus.
One of the things we must understand is that the tolerance of digital cameras and camcorders is asymmetrical, and it has been found that most machines have a feature that allows overexposure to be greater than the ability to allow underexposure, but not The greater the tolerance, the better. If the tolerance is too large, the photos will be dull and the layers will be unclear. If the tolerance is too small, the photos will be hard and the level will be lacking.
Fourth, the test of tolerance
After discussing so much, how to test the camera's tolerance is how big? Here is a well-known software Imatest for analysis, this software can test the machine's imaging latitude under certain signal-to-noise ratio. Here we still use a digital camera instead of a camera for testing.
Here we need to use an indirect way to test, because it is not particularly easy to set a gradient object whose dynamic range exceeds the latitude of the digital camera. We arranged a uniform light environment in the studio, using the Kodak grayscale board as the subject, and using multiple bracketing to relatively expand the dynamic range of the subject until the gray scale board has high light overflow and dark parts missing. Then, by analyzing the expressible dynamic range that these shots combine to achieve a range of camera imaging latitudes. Technically speaking, the latitude of a digital camera is mainly related to the photosensitive area of ​​a single pixel on the image sensor. Here we have selected the latest full-frame digital SLR camera Canon EOS 5D Mark II, small frame of the consumer digital SLR camera Canon 600D as the test object, the following is the test results, see Figure 4, Figure 5 (cited in Baidu library).
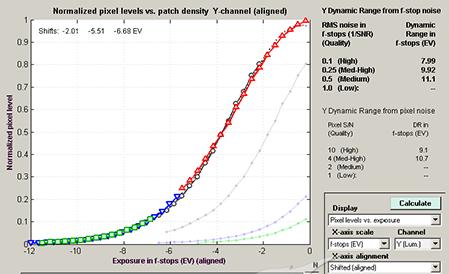
Figure 4 Test results of the Canon EOS 5D Mark II

Figure 5 Test results of the Canon EOS 600D
From the test results, the Canon EOS 5D Mark II and Canon 600D have a tolerance of 7.95 EV and 5.24 EV respectively under the same signal-to-noise ratio. It can be seen that the digital SLR camera with large-size sensor is more tolerant than the consumer camera. The degree is much larger. In addition, if the image signal-to-noise ratio conversion reference is set lower, the imaging latitude of the digital SLR camera can exceed 10 EV. In addition, if the digital camera supports a higher sampling rate, using RAW files for latitude testing in a 16-bit workspace per channel may result in higher test results. This test method is equally applicable to cameras.
V. Optimization of latitude and Gamma curve
As we said before, D-Lighting in the Nikon camera menu, Canon's "high-light tone priority", is a dynamic range optimization function, in fact, this is also a latitude optimization function. Before we talk about it, let's first get some knowledge of the Gamma curve.
Humans respond to external stimuli, such as the size of sound, but humans respond to these external stimuli in a non-linear manner. In other words, the proportion of human perception of stimuli changes is not the same as the proportion of actual stimuli. For example, if you put a spoonful of salt in a glass of water, we will feel salty and put a spoonful of salt. We don't think it is 2 times salty. At most, it will feel a bit salty, but if we use the instrument to measure , then the saltiness will definitely be twice that of the original, because the actual physical changes are linear, and the human perception is non-linear. You need to add a few more spoonfuls of salt, and humans may feel 2 times salty. It is the non-linear response of human beings to external stimuli. Similarly, the human eye's perception of the brightness of the outside light is also non-linear. When the outside light is twice as strong, we don't feel that it is 2 times brighter, but it feels brighter. It is because of this characteristic of human beings that we can distinguish objects with a wide range of brightness. For example, in a dark night, when there is a little light, we will feel bright enough, but when the light intensity continues to increase to very bright, you will find that the human eye will become very dull, and then increase the brightness, it will not I feel a lot brighter. In fact, the response curve of the human eye to this change in light is the gamma curve of the human eye. After all, Gamma is the response of an imaged object to incident light, and the curve obtained from different reaction values ​​at different brightness is the Gamma curve. As an imaging object, the human eye's Gamma curve is not a straight line, which means that the human eye's response to light is nonlinear.
Most of the imaging components in modern cameras or digital cameras are CCD or CMOS. How do they react to light, is it nonlinear like the human eye? The answer is no. The CCD and CMOS imaging methods obtain the picture by sensing the intensity of the light through the "silicon" in the image point, and the silicon photosensitive is the physical imaging, which will truly reflect the change of the light intensity, and how much is input as much as the input, so it is The response of light is linear. Here we can see that its Gamma curve is in conflict with the human eye's Gamma curve. However, it is not difficult for us to understand that the imaging of the camera may be more realistic. For example, in a low-light environment, the camera may not be able to see everything clearly because of the characteristics of the human eye, but they can’t do it. Getting the light is the same, but the response is different, which means that the human eye gets the picture and the camera is also obtained. So how to solve the conflict mentioned above, let the camera also output "the picture that the human eye sees"? The answer is to adjust the "reaction to light", that is, adjust the camera's Gamma curve to achieve the effect similar to the human eye. This function is available in most machines, but it is basically done automatically in low-end and mid-range cameras, and can only be manually modulated in some advanced cameras.
The aforementioned latitude optimization function is to change the contrast of the picture by adjusting the state of the gamma curve. If the curve is steep, the contrast of the output is relatively high. If the curve is slow, the contrast of the output is relatively low. However, this change is often reflected in the contrast of the highlights or shadows, which does not increase the overall latitude of the camera.
Conclusion
To get a high quality TV picture, the right exposure is essential. As an important theoretical basis for exposure, latitude has an irreplaceable role for cameras. Understanding the relationship between latitude and light and dynamic range, and obtaining reasonable exposure, it is easier to shoot good works. And because of the uniqueness of the human eye, it also makes us recognize the difference between the human eye and the camera, so that the Gamma curve can be better used for latitude optimization to achieve the purpose of camera imaging to adapt to the human eye. With the understanding of camera latitude and light, we have reason to believe that higher quality TV pictures will be produced in the future.
references
[1] The New York Institute of Photography: "Photography Teaching Materials, New York Institute of Photography", China Photography Press, 2009.08.
[2] KG Jackson, GB Townsend Editor: Handbook of Television and Video Engineers, China Film Press, 1997.10.
[3] Wang Jingchi: "TV Lighting Technology and Application", China Radio and Television Publishing House, 2010.06.
[4]
[5]
[6]
[7]
About the Author:
Xu Liming, after graduation, entered the CCTV Zhonghua Kehua Company to work in lighting technology. Now he serves the E01 group of the new CCTV station, mainly providing technical support and assisting in the recording of various programs. During the work, he also participated in the on-site lighting work of some programs, such as CCTV Social and Legal Channel's "Hotline", "Night Line", "Legal Lecture", CCTV Financial Channel's "Consumer Proposition", "China Financial Report", etc. .
Philizon focus on Greenhouse High Power Led Grow Lights and Full Spectrum LED Grow Lights Manufacturer China,Produce The Best Yields, Run More Efficiently, Use Half The Electricity Of Double Ended HPS.
LED grow lights are the most recent mass produced lamp on the market,although many people have not begun using them yet. Since the tiny LEDs might not be the first thing that you think of when you picture an indoor grow up,that is understandable.In reality,however, they truly are some of the most powerful,effective,and space saving grow lights that you are going to come across throughout your growing career.
Advantages
Plug with listed certificate safe to use.
Full Spectrum High Power Led Grow Light and High PAR for Plants growth.


Product Images


The Plug you can choose

Ageing Test

Application
Our professional High Power Led Grow Light are suitable for all the indoor plants and good for seeding, growth,flowering and fruiting stages of plants, increasing the harvest and Saving energy.
Package


Quality Control Systems

Warnings:
1.lndoor use only.
2.To avoid being damaged,do not use water or drip irrigation while using.
3.Sunshine lighting time should be 12-18 hours.
4.While irradiating the plants,the height of led grow lamp is not less than 10 inches,low height will cause the destruction of plants.
5.Highly hang the lamp will weaken the energy and affect the growth cycle of the plants, so the lamp should not be hung too high.
6.While taking care of the plants, please spray the leaves and branches 2-3 times everyday,to ensure the the plants do not wrinkle a wither, and have no phenomenon of few fruit, and hard pericarp.
Trade Terms
Payment: T/T, L/C, Paypal, 30% deposits before production, 70% balance to be paid before deliverying(Western Union are welcome)
Sample will be delivered within 7 working days.
Discounts are offered based on order quanlityes.
MOQ:sample order are acceptable
Delivery ways:DHL,UPS,FedEx,TNT, door to door,by sea,by air,etc.
High Power Led Grow Light
New Design Grow Light,High Power Grow Light,High Power Grow Lamp,Led High Power Grow Light
Shenzhen Phlizon Technology Co.,Ltd. , https://www.philizon.com