What is the Melo m9 firmware upgrade method? Here I provide three Mele m9 firmware upgrade methods, there are always upgrade methods for you, as well as Mele m9 firmware download package, interested friends worth a look. 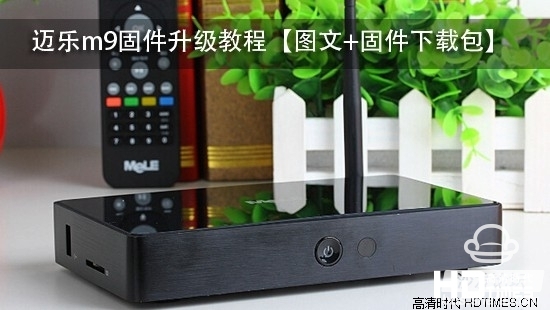
Mele m9 firmware upgrade method
1, the local upgrade method
The first step is to directly extract the downloaded software to the U disk root directory (level 1 directory) and insert the USB interface of the player to be upgraded.
Step 2: Then enter the system settings and select the local upgrade in the system upgrade.
Step 3: After the upgrade is complete, it is recommended to restore the factory settings again (pay attention to checking the format card) to avoid saving the residual information in the previous version.
If you cannot upgrade, please go to the file management USB device to see if you can find the update.zip file. If you are prompted to verify that the upgrade file fails, unzip it again and then safely remove the USB device.
Mele m9 local upgrade (U disk upgrade) firmware package download address, http://pan.baidu.com/s/1dDiZLs9
(Note: Only version 3.1.1 of M9 can be upgraded locally. Previous versions can only be upgraded by sd card upgrade)
2, SD card (U disk) upgrade
Step 1: In case of power failure, insert the sd card (which can be replaced with a Kingston U disk) into the sd card slot of the box, and then use the toothpick and other tools to hold the reset key;
The second step: power on, when the indicator on the box begins to flash, it indicates that the upgrade begins;
The third step: when the light stops flashing, the upgrade is over, pull out the sd card and power;
Step 4: Connect to the power supply and boot normally. The first time it will be initialized, it will take a few minutes.
3, Mele m9 OTG firmware upgrade
The first step: open PhoenixSuit, in the main interface state
PhoenixSuit tool download address, http://pan.baidu.com/s/1kT85WMF
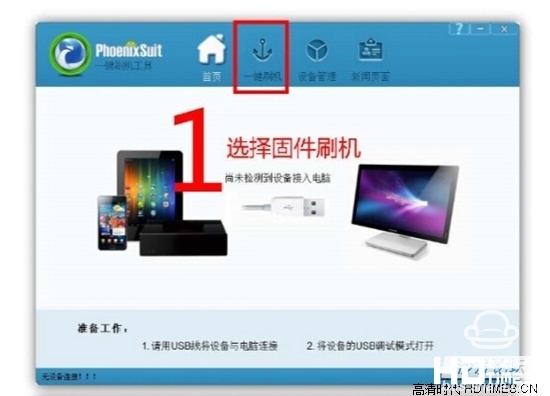
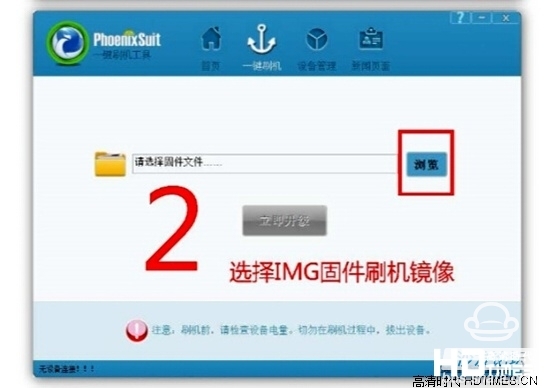
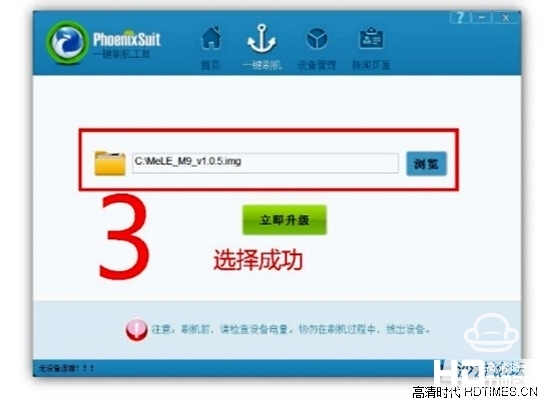
Step 2: Select the one-touch flash function and select the IMG firmware image package to be flashed. (usually XXX.img format)
IMG firmware image package download address, http://pan.baidu.com/s/1kTFr93p
The third step: Unplug all the M9 body cable. Including power cord
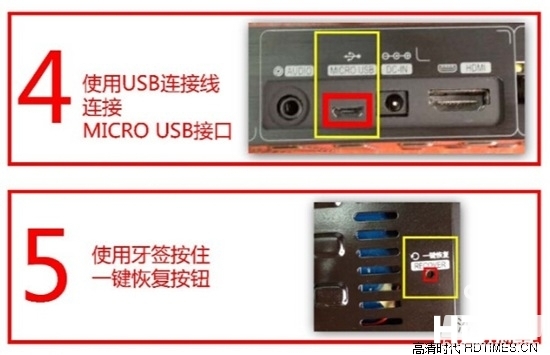
Step 4: Connect the small USB port to the Micro USB port on the body.
Step 5: Use a toothpick to press the one-button recovery button at the bottom of the fuselage and do not release it
Step 6: Connect the other end of the USB cable to the USB interface of the computer that has opened the PhoenixSuit.
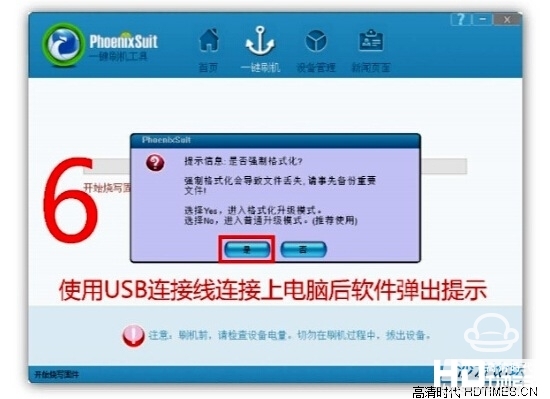
Step 7: At this point, wait for the PhoenixSuit interface to pop up. You can release the one-button recovery button and press OK to start the flashing.
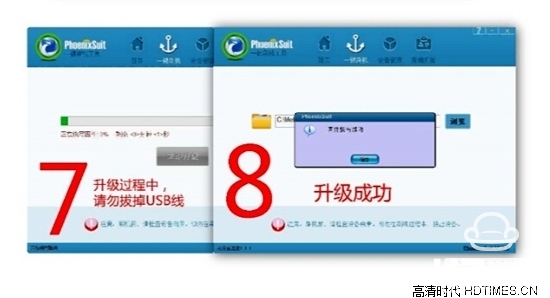
Step 8: After the success of the brushing, unplug the USB cable, and then connect the player and the TV according to the normal method.
4, SD card burning upgrade
The first step: first download the latest firmware of Mele M9 to the computer, after decompression there is an M9_V3.1.2_20131204.img file;
The second step: download the Brush Toolkit, decompress and run PhoenixCard.exe software;
PhoenixCard.exe brush machine tool download address, http://pan.baidu.com/s/1sjx4wBr
Step 3: Use a card reader to connect the sd card to the computer (need to ensure that there is only one external storage device at this time, otherwise the application does not know which device to burn);
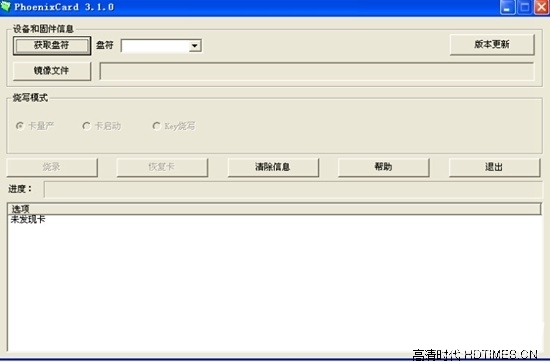
Step 4: Click the image file (button) and select the firmware you want to flash

);
Step 5: Click to flash (Note: The sd card will be formatted during the programming process. If there are important files on the sd card, please backup);
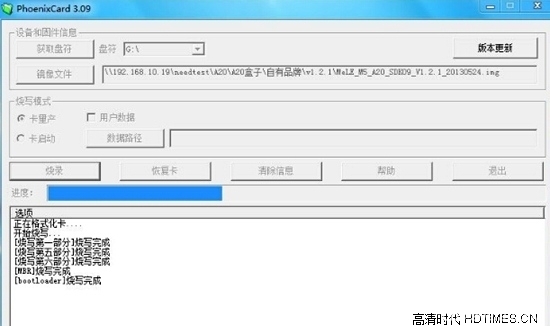
Step 6: When the progress bar is completed and the programming is finished, click Exit (button), and then pull out the sd card.
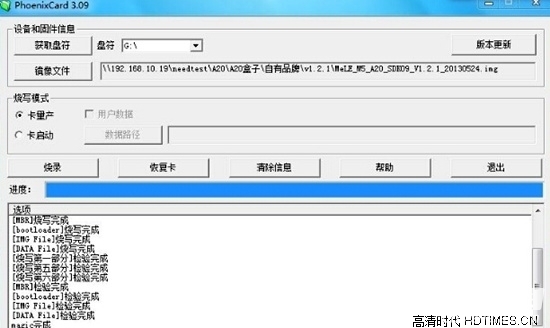
Here, the sd card is burned and can be used repeatedly.
The following is the use of burned sd card, upgrade the box:
1) In case of power failure, insert the sd card into the sd card slot of the box;
2) When the power is on, when the indicator light on the box begins to flash, it indicates that the programming is started;
3) When the indicator light stops flashing, the programming is completed, and the sd card and the power supply are pulled out (Note: If the sd card is not removed, the power supply will continue to be written again when the power is turned off);
4) Connect to the power supply and start the system normally. The first time it will be initialized, it will take several minutes.
Mele m9 firmware upgrade method
1, the local upgrade method
The first step is to directly extract the downloaded software to the U disk root directory (level 1 directory) and insert the USB interface of the player to be upgraded.
Step 2: Then enter the system settings and select the local upgrade in the system upgrade.
Step 3: After the upgrade is complete, it is recommended to restore the factory settings again (pay attention to checking the format card) to avoid saving the residual information in the previous version.
If you cannot upgrade, please go to the file management USB device to see if you can find the update.zip file. If you are prompted to verify that the upgrade file fails, unzip it again and then safely remove the USB device.
Mele m9 local upgrade (U disk upgrade) firmware package download address, http://pan.baidu.com/s/1dDiZLs9
(Note: Only version 3.1.1 of M9 can be upgraded locally. Previous versions can only be upgraded by sd card upgrade)
2, SD card (U disk) upgrade
Step 1: In case of power failure, insert the sd card (which can be replaced with a Kingston U disk) into the sd card slot of the box, and then use the toothpick and other tools to hold the reset key;
The second step: power on, when the indicator on the box begins to flash, it indicates that the upgrade begins;
The third step: when the light stops flashing, the upgrade is over, pull out the sd card and power;
Step 4: Connect to the power supply and boot normally. The first time it will be initialized, it will take a few minutes.
3, Mele m9 OTG firmware upgrade
The first step: open PhoenixSuit, in the main interface state
PhoenixSuit tool download address, http://pan.baidu.com/s/1kT85WMF
Step 2: Select the one-touch flash function and select the IMG firmware image package to be flashed. (usually XXX.img format)
IMG firmware image package download address, http://pan.baidu.com/s/1kTFr93p
The third step: Unplug all the M9 body cable. Including power cord
Step 4: Connect the small USB port to the Micro USB port on the body.
Step 5: Use a toothpick to press the one-button recovery button at the bottom of the fuselage and do not release it
Step 6: Connect the other end of the USB cable to the USB interface of the computer that has opened the PhoenixSuit.
Step 7: At this point, wait for the PhoenixSuit interface to pop up. You can release the one-button recovery button and press OK to start the flashing.
Step 8: After the success of the brushing, unplug the USB cable, and then connect the player and the TV according to the normal method.
4, SD card burning upgrade
The first step: first download the latest firmware of Mele M9 to the computer, after decompression there is an M9_V3.1.2_20131204.img file;
The second step: download the Brush Toolkit, decompress and run PhoenixCard.exe software;
PhoenixCard.exe brush machine tool download address, http://pan.baidu.com/s/1sjx4wBr
Step 3: Use a card reader to connect the sd card to the computer (need to ensure that there is only one external storage device at this time, otherwise the application does not know which device to burn);
Step 4: Click the image file (button) and select the firmware you want to flash
);
Step 5: Click to flash (Note: The sd card will be formatted during the programming process. If there are important files on the sd card, please backup);
Step 6: When the progress bar is completed and the programming is finished, click Exit (button), and then pull out the sd card.
Here, the sd card is burned and can be used repeatedly.
The following is the use of burned sd card, upgrade the box:
1) In case of power failure, insert the sd card into the sd card slot of the box;
2) When the power is on, when the indicator light on the box begins to flash, it indicates that the programming is started;
3) When the indicator light stops flashing, the programming is completed, and the sd card and the power supply are pulled out (Note: If the sd card is not removed, the power supply will continue to be written again when the power is turned off);
4) Connect to the power supply and start the system normally. The first time it will be initialized, it will take several minutes.